Building a simple static site generator in node.js

Kartik Nair / Sat Aug 07 2021
This blog is built using Gatsby.js an awesome static site generator for React (well it was built using Gatsby but I ended up switching to this project as you'll find out at the end). Gatsby was pretty easy to pick up and all I had to do was customize the gatsby-blog-starter to get something great. But I was curious how the generator so I decided to try and build a simple/barebones static site generator using nodejs. Feel free to follow along with the code on [GitHub](https://github.com/kartiknair/blog).
Why SSGs?
I love static site generators a lot because it allows you to use whatever heavy/bloated framework you want but the end result will still be just simple and light HTML, & CSS. This gives a sense of freedom which we wouldn't normally have if we were dealing with a create-react-app for example.
For this project here's the lighthouse score for the final result:
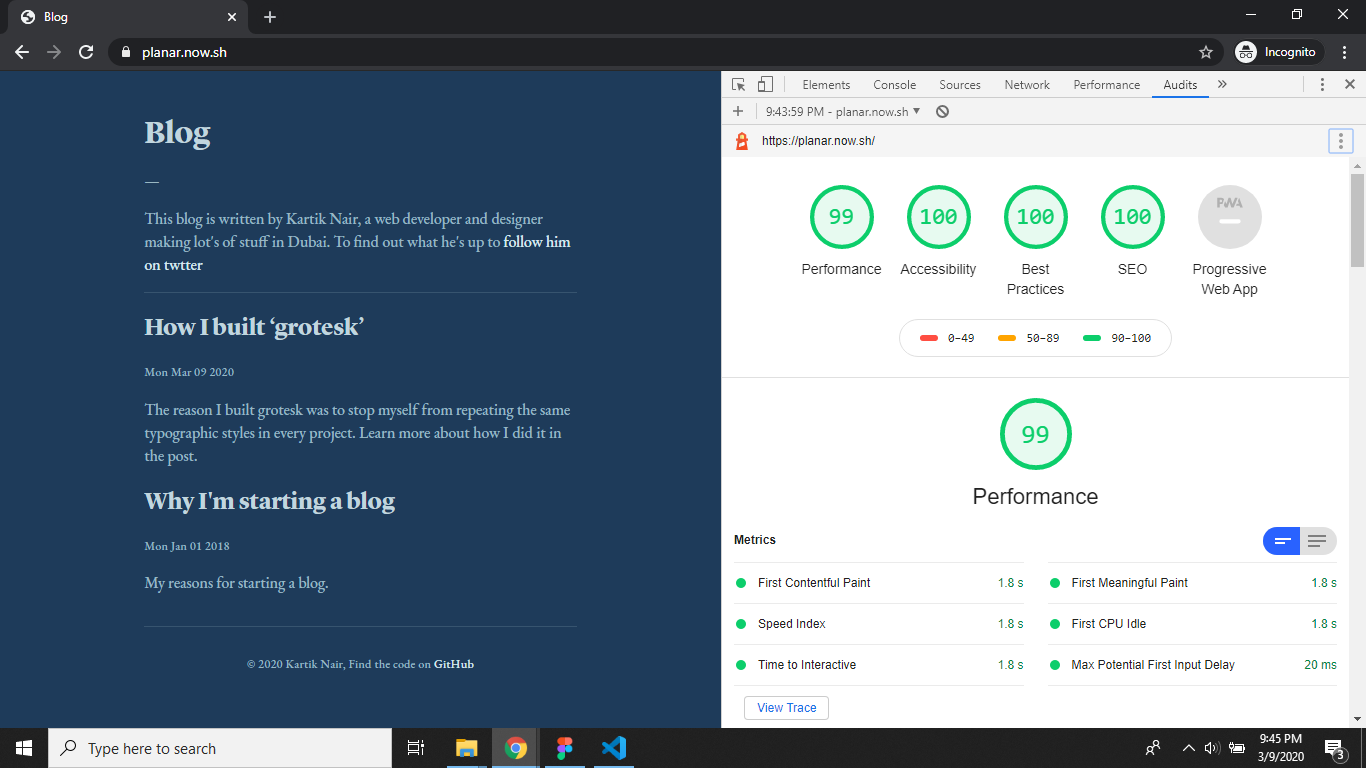
I know right! Pretty amazing. The only reason it didn't ace it was because of the heavy fonts but that's fine because they add enough aesthetic value for me to keep them.
Setup
So let's get started! Open up your command line and navigate to where you would like to make your project and then use the following commands to create a new nodejs project (these are for windows I'm sure you can translate them over to your OS).
mkdir node-ssg && cd node-ssg
npm init -y
Now we're gonna install some packages that are gonna make our life a hell of a lot easier while dealing with the data. The packages are:
- front-matter for extracting the yaml front matter from our posts
- marked for converting markdown to html
- highlight.js for syntax highlighting in code. We can install all of these using the following command:
npm i front-matter marked highlight.jsAlright now we can start with our project.
The build script
Let's think about what we wanna do first of all. So we want a build script that takes all the markdown posts from the content directory and spits out static html files in the public directory.
First of all let's create the script that will run when we call build. We'll put all our source code in the src directory so go ahead and make that in the root of your project. Then open up the project in your favorite code editor (I'm using VS Code) and add in a JavaScript file called index.js. Now we can add our build script to our package.json simply calling using node to run our index.js file. Your package.json should now look like this:
{
	"name": "planar",
	"version": "1.0.0",
	"description": "",
	"main": "index.js",
	"scripts": {
		"build": "node ./src/index.js"
	},
	"keywords": [],
	"author": "",
	"license": "ISC",
	"dependencies": {
		"front-matter": "^3.1.0",
		"highlight.js": "^9.18.1",
		"marked": "^0.8.0"
	}
}
Great now we can call npm run build in our project and it'll run our index.js file. Only problem is that our file doesn't do anything yet.
For testing purposes I'm going to create a content folder with my own blog posts. Since my current blog is also built using a static site generator I can just copy my content folder from there.
Decisions to make
Alright there are many decisions you should make before starting for example how should posts be stored? Should they be stored in their own folder or just as .md file? Where do you store images? And a lot more.
But since this projects scope is not very large I'm gonna go with a very simple file tree. All posts will be stored in the content directory as markdown files (.md) & other resources (like images) can be stored in ./public/assets/. These decisions were made to make file reading and writing simpler for this specific scenario but you can always change them to whatever is better suited for your project.
The config file
We can put the decisions we made in a config.js file so we can access it from anywhere by just requiring it. I put them in a dev object because there are other properties which we will add later. So this is how it looks right now:
const config = {
	dev: {
		postsdir: './content',
		outdir: './public',
	},
}
module.exports = config
Getting the posts
Alright let's start first of all with getting all the posts from the content directory. We can do this using the fs api that node.js gives us. So first of all we import fs and create an instance of it:
const fs = require('fs')Now we can use the methods that fs provides in this syntax: fs.methodName(). For getting posts we can use the readdirSync() method that fs provides. So let's see how it would look if we just got all the posts and logged them to the console:
const config = require('./config')
const posts = fs
	.readdirSync(config.dev.postsdir)
	.map((post) => post.slice(0, -3))
console.log(posts)
Now run npm run build in your console and you should see a list of posts if you did everything right. The reason we use slice() in the code is to get rid of the .md extension. You'll see why we have to do that later on.
Parsing post markdown
If you remember in the beginning we installed an npm package called front-matter. It helps us extract yaml front-matter from files. What is yaml front-matter? Well it's this amazing thing that lets you add extra yaml data to your files using --- before and after it to delimit it from the rest of the content. Here's an example of a blog post using yaml front-matter:
---
title: Post One
date: '2020-02-28T22:19:00Z'
description: My reasons for starting a blog.
---
# This is an amazing blog post.
Really it's just great
So now since we've gotten the posts in the previous step now we can parse them using front-matter. We're gonna put all of this post related code in posts.js so we have a cleaner working environment. So let's start off with getting the content from our files.
We can do that using the provided fs.readFile() method. Here's how it would look just logging the content of the file to the console:
console.log(fs.readFileSync('./foo.md'))But since we want reusable code that we can use for every single post in a loop, we'll put it in a function called createPost(). This function will use front-matter to take the content of the file and give us an object. This object will have the front-matter properties we set in a property called attributes & the rest of the content will be in a property called body. We can use front-matter by creating an instance to it using require and then calling it on our data once we read it from the file.
Here's how that would look like:
const config = require('./config')
const fm = require('front-matter')
const marked = require('marked')
const createPost = (postPath) => {
	const data = fs.readFileSync(
		`${config.dev.postsdir}/${postPath}.md`,
		'utf8'
	)
	const content = fm(data)
	content.body = marked(content.body)
	content.path = postPath
	return content
}
module.exports = createPost
If you check out the code you'll see that I call marked on the body of our post. All this does is convert the markdown into HTML so we can easily display it in our website later. I've also added the path of the post as an extra property because we will need it later on.
Now let's use this method in index.js and just log the output:
const config = require('./config')
const createPost = require('./posts.js')
const posts = fs
	.readdirSync(config.dev.postsdir)
	.map((post) => post.slice(0, -3))
	.map((post) => postMethods.createPost(post))
console.log(posts)
Configuring marked and syntax highlighting
Since we would like to use highlight.js to highlight our code. We can do that using marked and it's configuration object. Make a file called marked.js and in that we'll create an instance of marked configure it and then export it. Here's how that looks:
const marked = require('marked')
marked.setOptions({
	renderer: new marked.Renderer(),
	highlight: function (code, language) {
		const hljs = require('highlight.js')
		const validLanguage = hljs.getLanguage(language)
			? language
			: 'plaintext'
		return hljs.highlight(validLanguage, code).value
	},
	pedantic: false,
	gfm: true,
	breaks: false,
	sanitize: false,
	smartLists: true,
	smartypants: false,
	xhtml: false,
})
module.exports = marked
So now every time you use marked require it from this file directly.
Generating post HTML pages
Now we start with the actual page generation. To start of, we want it to create the public folder, if it doesn't exist already, we can do that using the fs.mkdirSync() and fs.existsSync() functions. Let's add that to our index.js file:
if (!fs.existsSync(config.dev.outdir)) fs.mkdirSync(config.dev.outdir)Now in our posts.js file let us make a createPosts() function, that will create and write the HTML files to the public directory. But before that we need a helper function called posthtml that will take the post JSON object and return a complete HTML page that we can simply write to a file. We will use the power of template literals to make our life easier in this function here's how it looks:
const posthtml = (data) => `
<!DOCTYPE html>
<html lang="en">
    <head>
        <meta charset="UTF-8" />
        <meta name="viewport" content="width=device-width, initial-scale=1.0" />
        <meta name="description" content="${data.attributes.description}" />
        <title>${data.attributes.title}</title>
    </head>
    <body>
        <header>
            <a href="/">Go back home</a>
        </header>
        <div class="content">
                <h1>${data.attributes.title}</h1>
            <p>${new Date(parseInt(data.attributes.date)).toDateString()}</p>
            <hr />
            ${data.body}
        </div>
    </body>
</html>
`
The reason I create a new Date() when adding the date to the post is so that all the dates have a consistent format. This is quite an opinionated way of doing it as it requires the date provided in the front-matter to be a "number representing the milliseconds elapsed since the UNIX epoch". However I don't mind running a quick Date.now() in the browser dev tools to get that number before I post. You can change that in the code if you would like.
Now we can create a function called createPosts() that'll take the output of the createPost() function and generate an HTML file. Here's how it looks:
const createPosts = (posts) => {
	posts.forEach((post) => {
		if (!fs.existsSync(`${config.dev.outdir}/${post.path}`))
			fs.mkdirSync(`${config.dev.outdir}/${post.path}`)
		fs.writeFile(
			`${config.dev.outdir}/${post.path}/index.html`,
			posthtml(post),
			(e) => {
				if (e) throw e
				console.log(`${post.path}/index.html was created successfully`)
			}
		)
	})
}
module.exports = {
	createPost: createPost,
	createPosts: createPosts,
}
As you can see it doesn't generate a file called postname.html but rather it makes a directory called postname and then adds and index.html in that directory so that the path for that post in the browser will be yourwebsite/postname not yourwebsite/postname.html.
Now let's call it in index.js and see if it worked:
const fs = require('fs')
const postMethods = require('./posts')
const config = require('./config')
const posts = fs
	.readdirSync(config.dev.postsdir)
	.map((post) => post.slice(0, -3))
	.map((post) => postMethods.createPost(post))
if (!fs.existsSync(config.dev.outdir)) fs.mkdirSync(config.dev.outdir)
postMethods.createPosts(posts)
If everything worked right you should've seen a public directory pop up with a few directories in it (based on how many posts you had).
Author about section
This blog will also include a small about section in it's homepage for the author, so we need to add the info for that into our config.js file. So here's our revised config.js file:
const config = {
	blogName: 'Blog',
	blogDescription: 'Sharing what I learn',
	authorName: 'Kartik Nair',
	authorDescription:
		"a web developer and designer",
	authorTwitter: 'https://twitter.com/kartiknair',
	dev: {
		postsdir: './content',
		outdir: './public',
	},
}
module.exports = config
The homepage
The homepage will be the index.html file in the public directory. It should have a header with the blog's name and a small about section for the author. We can use template literals like we did before to generate the HTML for that. Let's call the function homepage() and put it in a file called homepage.js . Here's how that file looks now:
const homepage = (posts) => `
<!DOCTYPE html>
<html lang="en">
    <head>
        <meta charset="UTF-8" />
        <meta name="viewport" content="width=device-width, initial-scale=1.0" />
        <meta name="description" content="${config.blogDescription}" />
        <title>${config.blogName}</title>
    </head>
    <body>
        <div class="grotesk">
            <header>
                <h1>${config.blogName}</h1>
                <p>—</p>
                <p>This blog is written by ${config.authorName}, ${
	config.authorDescription
}. To find out what he's up to <a href="${
	config.authorTwitter
}">follow him on twtter</a></p>
                <hr />
            </header>
            <div class="posts">
                ${posts
					.map(
						(post) => `<div class="post">
                    <h3><a href="./${post.path}">${
							post.attributes.title
						}</a></h3>
                        <small>${new Date(
							parseInt(post.attributes.date)
						).toDateString()}</small>
                        <p>${post.attributes.description}</p>
                    </div>`
					)
					.join('')}
            </div>
            <footer>
                ${`<p>© ${new Date().getFullYear()} ${
					config.authorName
				}, Find the code on <a href="github.com/kartiknair/blog">GitHub</a></p>`}
            </footer>
        </div>
    </body>
</html>
`
Now we need to actually create the file so we can add this HTML to it. We can make that a function called addHomepage() and also add that to the same file. Here's how it looks:
const addHomePage = (posts) => {
	fs.writeFile(`${config.dev.outdir}/index.html`, homepage(posts), (e) => {
		if (e) throw e
		console.log(`index.html was created successfully`)
	})
}
Now we can simply export it out using module.exports = addHomePage and call it in our index.js file. Here's our revised index.js file:
const fs = require('fs')
const postMethods = require('./posts')
const config = require('./config')
const addHomePage = require('./homepage')
const posts = fs
	.readdirSync(config.dev.postsdir)
	.map((post) => post.slice(0, -3))
	.map((post) => postMethods.createPost(post))
	.sort(function (a, b) {
		return b.attributes.date - a.attributes.date
	})
if (!fs.existsSync(config.dev.outdir)) fs.mkdirSync(config.dev.outdir)
postMethods.createPosts(posts)
addHomePage(posts)
As you can see I also sorted the posts by latest date so that the latest post is first.
The assets directory
We can store any files that we don't want touched by the generator in ./public/assets. For example if you wanted to add styling to this blog you could add the following to your homepage function:
<link rel="stylesheet" href="./assets/main.css" />and now you can style your blog as you like. Images also work in the same way, for example if in a post markdown file you wanted to add an image you could do the following:
Here's an image:
Making it look pretty
Ah! Now my favorite part, it's time to make it look nice. I don't know about you but looking at those default HTML styles was hurting me a lot. To make my life simple I'm just gonna plug grotesk into the project & customize it. Here's the ./public/assets/styles/main.css file:
:root {
	font-size: calc(0.75rem + 0.5vw);
}
.grotesk {
	width: 60%;
	margin: 5% 20% 0 20%;
}
@media (max-width: 500px) {
	.grotesk {
		width: 80%;
		margin: 8% 10% 0 10%;
	}
}
img {
	max-width: 100%;
}
As you can see I've decided to go with fluid type for this project. I also brought in grotesk.light.scss and customized the variables. Here's how the variables look now:
$bg: #1e3b5a;
$fg-body: #99b7c3;
$fg-headings: #c1d6df;
$hr-color: rgba(153, 183, 195, 0.2);
$a-color: #d8e9f0;
$pre-bg: rgba(153, 183, 195, 0.07);
$pre-color: $fg-body;
$inline-code-bg: rgba(153, 183, 195, 0.07);
$inline-code-color: #c1d6df;
$quote-bg: $bg;
$quote-border: #8a4baf;
$quote-color: #6a727c;
I also customized the fonts.scss file that came with grotesk. Here's how it looks like now:
@font-face {
	font-family: lyon;
	src: url('../fonts/LyonDisplay-Bold.otf');
	font-weight: 800;
}
@import url('https://fonts.googleapis.com/css2?family=EB+Garamond:wght@500&display=swap');
$font-fam-main: 'EB Garamond', serif;
$font-fam-headings: lyon, serif;
$font-fam-mono: Menlo, Monaco, Consolas, 'Liberation Mono', 'Courier New',
	monospace;
$line-ht-main: 1.5;
$line-ht-mono: 1;
As you can see I've imported two fonts for this blog. Lyon Display which is locally hosted & EB Garamond which is a Google Font.
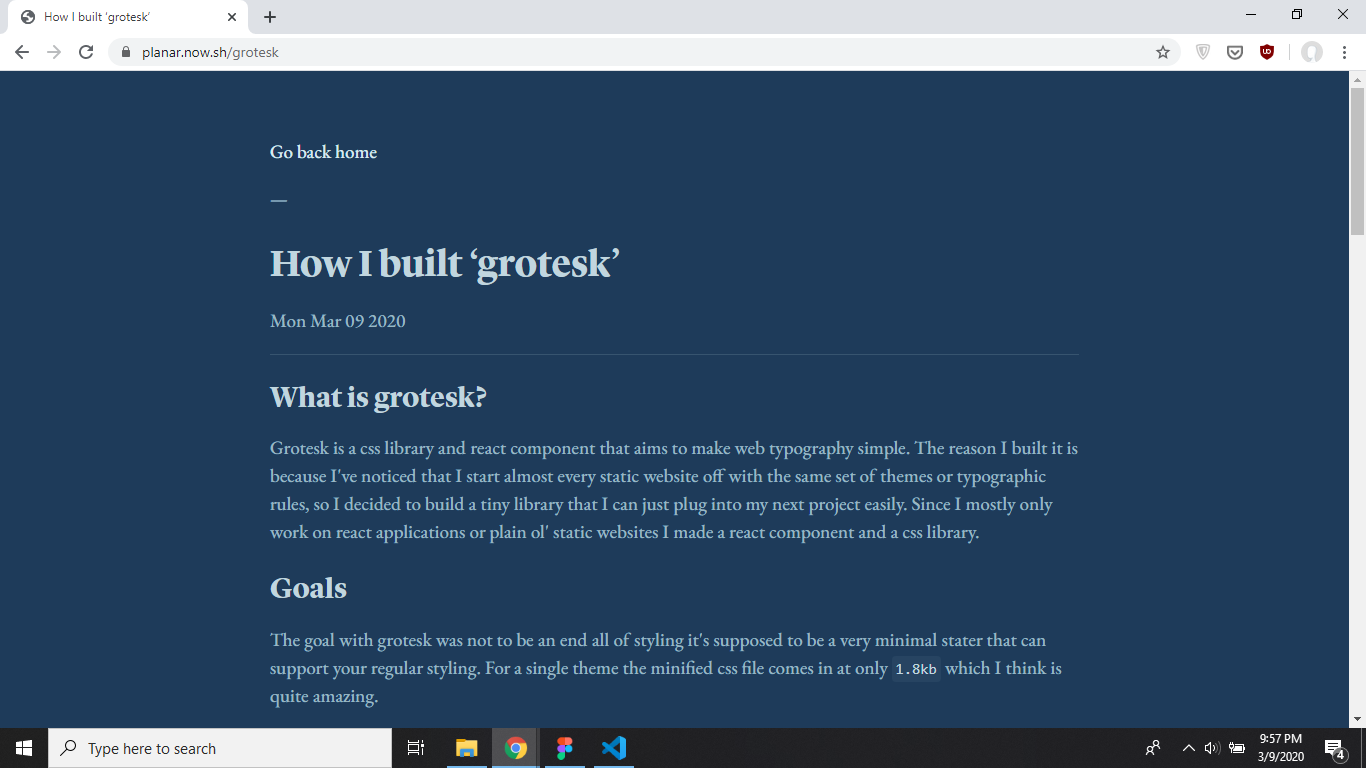
That's it for the styling. It ended up looking way better than I expected & you can see the final result here:
Hosting
I personally like using Vercel for hosting but some other free options I like as well are Netlify and GitHub Pages. Since vercel integrates so well with npm build scripts that output to a public directory, all I had to do was run vc--prod in the root of the directory (when you run it the first time it'll ask you some configuration questions the default answer to all of them is fine). Now every time I want to update my blog all I have to run is vc --prod again and it'll update my blog and run npm run build by default.
Final Thoughts
Thanks for reading this very long article. I hope you learnt a little something about nodejs. I personally learnt a lot about the fs api and enjoyed making this a lot. I liked it so much that I actually ended up switching my personal blog from gatsby to this. That might be a bad decision but I can always work it out later. Just a reminder you can find all the source code on GitHub so feel free to fork it or open an issue if you find something wrong.
I'm gonna keep working on this to fine tune it to my needs, and maybe experiment with a few different things like maybe lit-html or mustache for templating. But for now that's it for this post, see you in another one very soon.